If you sell products by the square metre, the linear foot, or the custom size, a Shopify measurement price calculator is the fastest way to stop losing sales to confusing pricing. Instead of forcing shoppers to email you for a quote or guess which variant fits, the calculator lets them enter their own measurements and see an accurate price instantly on the product page. This guide walks through how to add a price calculator to a Shopify product page using PL Custom Price Calculator by Pluginos: what to plan before you install, how to configure each pricing rule, and how to test it before it goes live.
Why Shopify Product Pages Need a Measurement-Based Price Calculator
Shopify's default product page assumes a fixed price per item or per variant. That works for a T-shirt. It breaks down for anything sold by dimension.
The problem with fixed variants
A tile shop selling by area, or a blind maker selling by width and height, would need hundreds or thousands of variants to cover every size combination. Shopify limits how many variants a product can have, and even below that limit, a giant variant dropdown is slow to manage and frustrating to use.
What customers expect instead
Shoppers buying flooring, fabric, wallpaper, or made-to-measure products want to type in their own numbers and see the total. When they can't, they leave, or they message you, and your team ends up quoting prices by hand.
What a measurement price calculator solves
- Customers see the exact price before they add to cart.
- You avoid maintaining huge variant lists.
- You cut down on manual quotes and pricing errors.
- Pricing stays consistent across every product and collection.
What Is PL Custom Price Calculator?
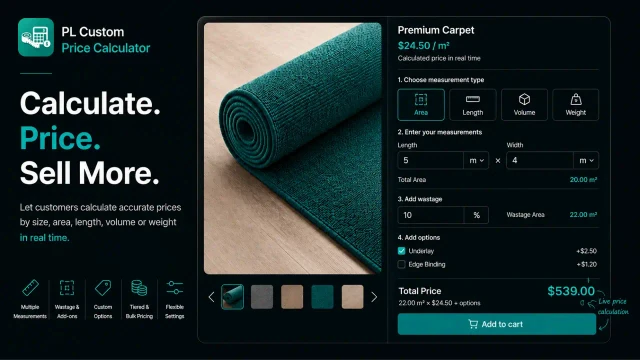
PL Custom Price Calculator, built by Pluginos, is a Shopify app that calculates prices based on size, length, area, volume, weight, or coverage. Customers enter measurements on the product page, and the price updates in real time.
Core capabilities at a glance
- Measurement types: weight, length, area, volume, surface area, and tile coverage
- Multiple units: support for different measurement units, with minimum and maximum limits
- Flexible pricing: use the product's own price or set a specific per-unit price for each pricing rule
- Wastage: add a wastage percentage to the calculation
- Custom options: unlimited product options such as checkboxes, radio buttons, and dropdowns
- Bulk pricing: quantity-based prices and discounts
- Scope control: apply rules to specific products or whole collections
- Design control: customize calculator colors, borders, and labels, with a live preview
Who it's built for
It suits merchants selling flooring, tiles, blinds, fabric, wallpaper, and other measurement-based products. It also fits any store where the price depends on a customer-entered value rather than a fixed variant.
Before You Start: Plan Your Pricing Logic
A few minutes of planning saves a lot of reconfiguring later.
Step 1: Decide what the customer measures
Match the calculator to how you actually sell:
|
Product type
|
What the customer enters
|
Pricing basis
|
|
Floor tiles, carpet
|
Room length and width
|
Price per area
|
|
Blinds, curtains
|
Width and height
|
Price per area or per size
|
|
Fabric, ribbon, rope
|
Length needed
|
Price per unit length
|
|
Concrete, soil, mulch
|
Length, width, depth
|
Price per volume
|
|
Bulk materials
|
Weight needed
|
Price per weight
|
|
Wallpaper
|
Wall dimensions
|
Price per coverage
|
Step 2: Define your unit and limits
Pick the units your customers think in (metres, feet, inches, square feet) and decide on sensible minimum and maximum values. A minimum order size protects your margins, and a maximum prevents impossible orders.
Step 3: Choose your price source
You can use the product's existing price as the per-unit rate, or set a specific per-unit price inside each pricing rule. Use the product price if you already maintain rates in Shopify. Set a rule-level price if different rules need different rates.
Step 4: Map out extras
List any add-ons that change the price: cutting fees, finishes, installation, rush production. These become custom options in the calculator.
How to Add a Price Calculator to a Shopify Product Page
The steps below follow the app's feature set. Menu labels may differ slightly, so follow the in-app prompts where they vary.
Step 1: Install the app from the Shopify App Store
Open the PL Custom Price Calculator listing, click Install, and choose your store. The app includes a 7-day free trial, so you can build and test your calculators before paying.
Step 2: Create your first pricing rule
Pricing rules are the foundation of the app. Each rule defines how a price is calculated for a set of products. The Standard plan supports unlimited pricing rules, so you can create separate rules for different product types.
Step 3: Choose the calculation type
Select the measurement your product is sold by: area, length, volume, weight, surface area, or tile coverage. The app also includes 7+ predefined price calculators, which give you a faster starting point than building from scratch.
Step 4: Set units, minimums, and maximums
Choose the measurement units to show and enter the minimum and maximum values customers can type in. This keeps orders inside what you can actually produce and ship.
Step 5: Set the price per unit
Either use the product price or enter a custom per-unit price for this rule. For example, if a tile sells at $30 per square metre, set that as the unit rate.
Step 6: Add wastage
Many measurement-based products need extra material to cover cuts, breakage, and pattern matching. Enable wastage and enter a percentage so the calculator includes it automatically.
Step 7: Add custom options and add-ons
Add checkboxes, radio buttons, or dropdowns for extras such as finishes, edge treatments, or installation. Each option can affect the final price.
Step 8: Set up tiered and bulk pricing
Reward larger orders with quantity-based pricing. For example (illustrative numbers):
- 1 to 10 sq m: $30 per sq m
- 11 to 50 sq m: $27 per sq m
- 51+ sq m: $24 per sq m
Step 9: Apply the rule to products or collections
Assign the rule to individual products or to a whole collection. Collection-level rules save time when many products share the same pricing logic.
Step 10: Customize the calculator's appearance
Adjust colors, borders, and labels so the calculator matches your theme. Use the live preview to check how it looks before publishing.
Step 11: Test on the product page
Open the product page as a customer would. Enter measurements, check the price, and add the item to the cart. Confirm the cart and checkout show the correct total.
Worked Example: Tile Pricing With Wastage
Suppose a customer wants to tile a 4 m × 5 m room, and your tile costs $30 per square metre with 10% wastage.
- Area: 4 × 5 = 20 sq m
- Add 10% wastage: 20 × 1.10 = 22 sq m
- Price: 22 × $30 = $660
The customer sees this total as they type, without needing a quote. If you add bulk tiers, the per-unit rate adjusts automatically as the quantity grows.
Best Practices for Product Page Calculators
Keep the calculator above the fold
Place it near the price and Add to Cart button so customers see it without scrolling.
Use clear labels and units
Say "Width (cm)" instead of just "Width." Ambiguous units are a leading cause of wrong orders and returns.
Explain wastage in plain language
A short note such as "Includes 10% extra for cuts and waste" builds trust and prevents disputes.
Set realistic minimums and maximums
Base them on production capacity, shipping limits, and profitability.
Test on mobile
Many shoppers measure and buy from a phone. Check that the inputs are easy to tap and that the price is visible while typing.
Common Mistakes to Avoid
- Ignoring wastage: you undercharge and lose margin.
- Mixing units: customers enter feet while the rule expects metres.
- Skipping the checkout test: always confirm the price carries through to the cart.
- Building one giant rule: use separate rules for products with different logic.
- Leaving default labels: custom, product-specific labels improve conversions.
Pricing: What Does the App Cost?
PL Custom Price Calculator has a single Standard plan at $11.99 per month, or $129.49 per year, which saves 10%. A 7-day free trial is available. The plan includes unlimited pricing rules, multiple measurement units, custom product options, tiered and bulk pricing, wastage calculation, and calculator customization with live preview.
Frequently Asked Questions
Can I use a price calculator for products sold by area or length?
Yes. The app calculates prices by area, length, volume, weight, surface area, and tile coverage, using the units you choose.
Can I apply one calculator to a whole collection?
Yes. Rules can be applied to specific products or collections, so you don't need to configure each product separately.
Does it support bulk discounts?
Yes. You can set quantity-based prices and discounts to reward larger orders.
Can I add extra options like finishes or installation?
Yes. You can add unlimited product options, including checkboxes, radio buttons, and dropdowns.
Can I use my existing product price as the base rate?
Yes. Each rule can use the product price or a specific per-unit price you set.
Is there a free trial?
Yes, there is a 7-day free trial on the Standard plan.
Conclusion
Adding a measurement-based calculator turns a confusing product page into a clear, self-serve buying experience. Plan your measurement type, units, and limits first, then build your rules, add wastage and options, apply them to products or collections, and test before launch. To set one up on your store, you can install PL Custom Price Calculator from the Shopify App Store and start with the 7-day free trial.